
Learn Photography by Experimenting with the Luce Camera Simulator
Explore the Luce 3D camera simulator. Experiment with aperture, shutter speed and ISO, then discover custom interactive product simulations for your brand.
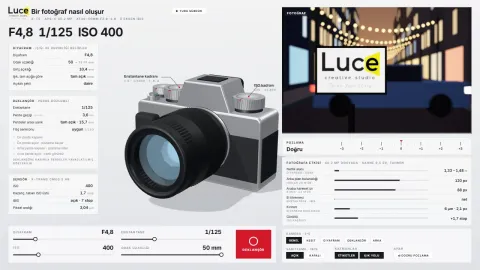
Changing a camera setting can affect much more than brightness. Motion, depth of field and the appearance of the background can change too. Comparing settings in the same scene is a practical way to understand those relationships.
Luce’s interactive camera simulator lets you explore the balance between aperture, shutter speed and ISO. Inspect a three-dimensional camera while watching how the controls affect a simulated photograph.
What can you try?
The experience is based on the X-T5 and XF16–50mm. Adjust aperture, shutter speed, ISO and focal length. Switch from an overall view to a cutaway, then explore the aperture, focal-plane shutter and sensor. An automatic tour introduces different settings and camera views. Use any control to take over.
The aim is to help you understand which changes produce which effects, before trying to memorize camera settings.
Aperture: light and depth of field
Aperture is the opening that controls how much light passes through the lens. Lower the F number and the opening gets larger, allowing more light to reach the sensor under the same conditions. A higher F number makes the opening smaller.
Aperture also affects depth of field. With other conditions unchanged, a wider aperture can make the background more blurred. Compare F4.8 and F16 in the simulator: what happens to brightness and the lights in the background?
Shutter speed: freeze movement or leave a trail
Shutter speed describes the exposure time. Short exposures help freeze movement; longer exposures allow moving objects to leave trails. Camera shake can also become more visible during a long exposure.
Compare 1/4000 second with 1/8 second and watch the moving car. Then toggle IBIS. Reducing camera shake and freezing a moving subject solve different problems.
ISO: the third exposure control
Increasing ISO can make the image brighter and increase noise. It does not add light to the scene. Choose aperture and shutter speed for the photograph you want, then consider ISO as part of that balance.
For example, a fast shutter speed chosen to freeze movement may produce a dark image. If you cannot open the aperture further, increase ISO and inspect the result.
Three steps for your first experiment
- Watch the automatic tour. Get familiar with the camera components and the effects of its settings.
- Change one setting at a time. Start with aperture, then try shutter speed. Observe the differences before adjusting everything together.
- Restore the balance. Try compensating for a fast shutter speed with aperture or ISO. Use Correct exposure as a comparison point.
A wide desktop view gives you more room to explore. On a phone, landscape orientation and full screen are recommended. This is an approximate educational visualization; real photographs depend on the scene, lens and device behavior.
Your product could be explained the same way
This camera is one example of an interactive simulation. The same approach can demonstrate the operating principles of other products, revealing components and the effects of their controls in a three-dimensional experience.
A custom application can let visitors explore parts, try controls or follow a guided scenario. Potential uses include product demonstrations, sales meetings, exhibition presentations and user guides.
At Luce, we start by defining what you want to explain and who needs to understand it. Together we scope the 3D modeling, interactions and web application. Explore custom product and machine simulations or tell us about your project.